Advanced Features
Advanced Features
This page explains the advanced editing features included in DyNode.
Commands
You can use the built-in console and a series of editing commands in DyNode to perform quick and advanced operations on your chart.
Press . or / to open the console.
Opening the console with different keys will add different prefixes, . and /, to the command.
- If the finally executed command has a
.prefix, the console will close immediately after the command is executed, allowing you to quickly perform continuous editing operations on the chart. - If the finally executed command has a
/prefix, the console will not close after the command is executed. - The finally executed command can also have no prefix.
A command consists of a command name and a variable number of command arguments. Different commands may require different numbers of arguments. If you need to use a command, you need to check its name, the required number and type of arguments, and its effect. You can also use the command's abbreviation instead of its name. The command arguments and name must be separated by spaces.
A command may also have multiple variants, which may require different numbers of arguments and have different effects.
Below is a list of all available commands and their details, described in the following basic format.
.<command_name> <required_arg1> <required_arg2> ... [optional_arg1] [optional_arg2] ...
    // Effect of the command
    .<abbreviation1>
    .<abbreviation2>
    ...
Different command variants will be described as different commands, but their abbreviations will not be repeated.
Additionally, if a command has a variant with only one argument, and that argument is a real number, the following command format is also recognized. This allows you to quickly enter shorter commands.
.<command_name><argument1>For example:
.w1.5   // Change the width of selected notes to 1.5
.p2.5   // Change the position of selected notes to 2.5
.s2     // Change the side of selected notes to the right side
If you enter more arguments than the maximum number of arguments for the matched variant, the extra arguments will be appended to the last argument, separated by spaces. This is convenient for entering commands that require a single string argument. You can also enclose the content to be recognized as a single argument in double quotes.
You can use ↑ / ↓ to quickly navigate to previously used commands.
You can use ESC or .q to close the console.
Quick Start
Tips
If you need to quickly get started with the command feature, here is a guide to help you understand the basics.
You can follow the steps below to quickly batch-modify notes to your desired width.
- Select the notes you want to modify.
- Press the . key.
- Enter
w1.5. Or change1.5to any value you want. - Press Enter.
You can follow the steps below to quickly generate a curve among the selected notes in chronological order and fill it with notes.
- Select the notes on the same side that you want to connect.
- Press the . key.
- Enter
linorcub. - Press Enter.
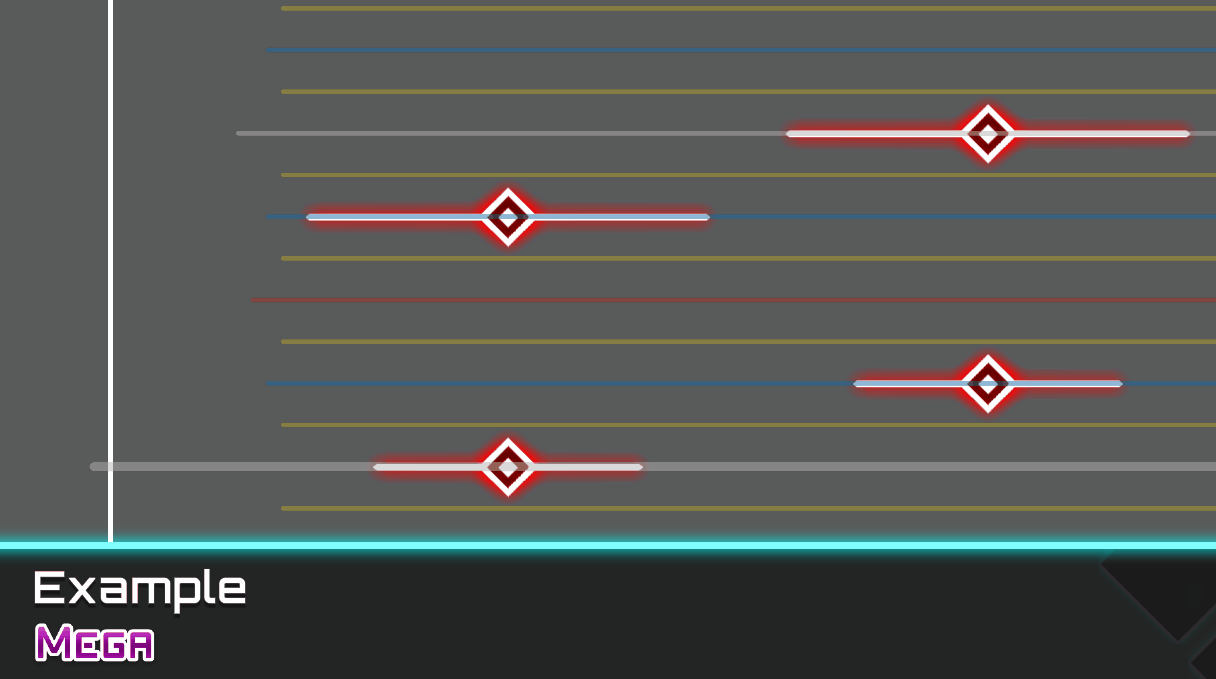
Regarding Curve Command Variants
You can also enter lin8. Here, 8 represents the overriding beat subdivision. At this subdivision, the filled notes will be 32nd notes. By default, the curve generation command will use your current beat subdivision.
Alternatively, enter lin tap. Here, tap represents the type of note you want to fill with.
These two arguments can be in any order. You can enter lin 8 tap or lin tap 8.
However, lin8 tap is not allowed. The short command format only supports single-argument variants.
Basic Property Editing
You can use the following series of commands to quickly edit the basic properties of selected notes.
.width <real_number>
    // Change the width of selected notes
    .w
    .wid

.position <real_number>
    // Change the position of selected notes
    .p
    .pos

.side <0|1|2|any_integer>
    // Change the side of selected notes. 0 - Front; 1 - Left; 2 - Right.
    // You can also enter any integer, which will be mapped to a value between 0 and 2.
    .s

.time <real_number>
    // Change the time of selected notes, in milliseconds
    .t
Curve Filling
You can use the following series of commands to generate curves for the selected notes and smoothly fill notes between them along the beat lines.
.linear <variable_arguments>
    // Curve Filling - Linear
    .lin
.cosine <variable_arguments>
    // Curve Filling - Cosine
    .cos
.cubic <variable_arguments>
    // Curve Filling - Natural Cubic Spline
    .cub
.catrom <variable_arguments>
    // Curve Filling - Centripetal Catmull-Rom Spline
    .crom
These commands will take all your selected notes, sort them by time, generate a curve from this sequence, and then smoothly fill notes between them.
All the commands above share the same arguments and effects; they only differ in the curve generation algorithm used.
Your selected notes must be on the same falling side.
You can append any number of arguments to the commands above. They will be applied in order to this curve generation.
- If an argument is a positive integer
x, it will override your current beat subdivision setting. The filled notes will be4*x-th notes. - If an argument is a negative integer
-x, it will override your current beat interval setting.- It will start placing notes from the next
xbeat lines after the first note, and then place the second note on the nextxbeat lines after the placed note, until it exceeds the last note of this segment. - The default interval setting is
1.
- It will start placing notes from the next
- If an argument is a note type, the filled notes will be of the type you selected.
- TAP: represented by
tap/normal/note. - SLIDE: represented by
slide/chain. - HOLD: represented by
hold. - If you don't use this argument, the note type for a curve fill segment will be copied from the note type at the head of that curve.
- TAP: represented by
For example, .cubic slide 8 means to fill with SLIDE notes between the selected notes using a natural cubic spline curve at a 32nd note subdivision.
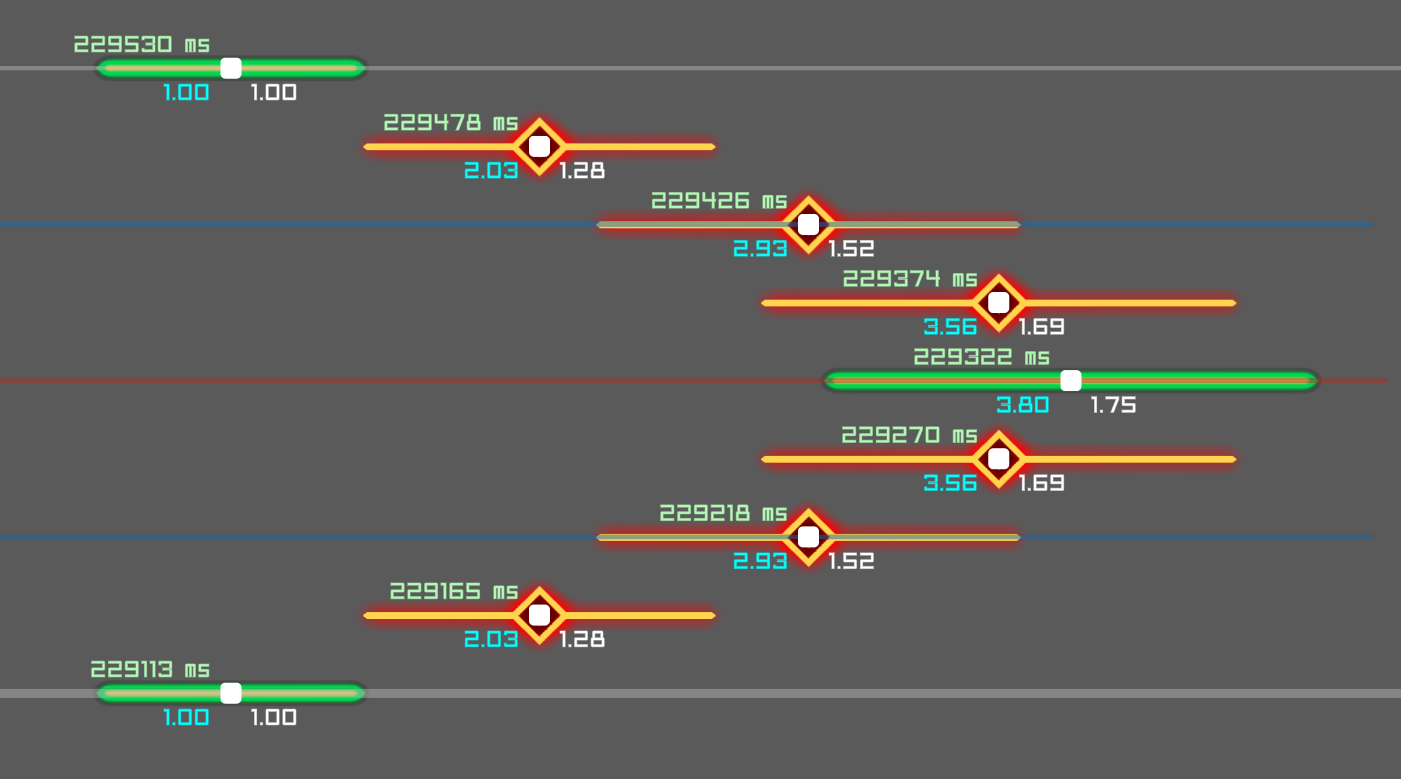
.cubic 8 -2 makes the generated notes spaced by one 32nd note. This allows you to generate curves in an interleaved manner.

Batch Advanced Operations
You can use the following series of commands to perform advanced operations on notes.
Snap Command
The snap command allows you to batch-fix offset notes to the correct time points.
.snap [pre|post|nearest]
    // Batch snap all selected notes to the beat lines.
    // The argument determines the target beat line for snapping.
    // `pre` is the default value when no argument is provided.
Different arguments determine the snapping target.
pre: Each note will snap to the nearest preceding beat line.post: Each note will snap to the nearest succeeding beat line.nearest: Each note will snap to the closest beat line.
Duplicate and Deduplicate Commands
The duplicate command allows you to perform multiple batch quick duplications rapidly. This is equivalent to using the quick duplicate function several times consecutively on selected notes.
.duplicate [integer]
    // Batch duplicate selected notes to the next beat line after the latest note.
    // The optional argument specifies the number of times to repeat this operation.
    .d
    .dup
The deduplicate command allows you to quickly deduplicate selected or all notes. For all notes with identical properties, this command will only keep one.
.deduplicate
    // Deduplicate selected or all notes.
    .dedup
Other Commands
.center
    // Move the selected notes so that their leftmost and rightmost ends are symmetrically centered.
    .cen

.purge
    // Delete all notes.

.fix
    // Fix common errors with notes.
    // - Fix out-of-bounds notes by moving all out-of-bounds notes back within the boundaries.

.expr <expression>
    // Execute an expression on the selected notes. See the guide's [Advanced Editing/Expressions] for details.
    .e
Miscellaneous Commands
.echo <string>
    // Output a line of content.

.quit
    // Close the console
    .q
Expressions
Press 0 or use .expr / .e to input an expression.
A valid expression is a meaningful statement composed of a series of operators, numbers, variables, and functions, for example: a=10+b*c, 100>90, etc.
Expressions support the basic arithmetic operators +,-,*,/,%, bitwise operators <<,>>,|,&, logical operators &&,||,!, relational operators >,<,>=,<=,==,!=, and the assignment operator =.
Functions are called using function_name(arg1, arg2, ...). For example sin(0), pow(2,3), etc.
You can write expressions in a C-like syntax. Some valid expression examples are as follows:
a=(10+20)*30        // a=900
b=a                 // b=900
b=a=20              // b=(a=20), right-associative
c=10*20/20          // c=(10*20)/20, left-associative

a=rand(5)           // rand(5) returns a random real number in [0, 5]
b=pow(2,3)          // b=8, pow(2,3) is 2 raised to the power of 3, which is 8
c=sin(0)+cos(0)     // c=1
You can use expressions to batch modify the properties of all notes or selected notes.
The currently supported note property variables are listed in the table below:
| Property | Function | Unit | Note Type Restriction |
|---|---|---|---|
time | The time the note occurs. | ms | |
bar | The note's Bar (measure number). | ||
abar | The note's absolute Bar value, write-only. | ||
pos | The position of the note. | ||
side | The falling side of the note (0-Front/1-Left/2-Right). | ||
wid | The width of the note. | ||
index | The index of the current note among all processed notes, counted from 0. | ||
bpm | The BPM value of the Timing Point containing the note, read-only. | ||
meter | The meter value of the Timing Point containing the note, read-only. | ||
tptime | The start time of the Timing Point containing the note, read-only. | ||
len | The duration of the note. | ms | HOLD |
htime | The head time of the note. | ms | HOLD |
etime | The tail time of the note. | ms | HOLD |
These property variables are bound to the note's properties in real time. As a result, modifying some variables may also affect other variables. For example, modifying htime or etime also affects time and len, while modifications to time and bar affect each other in real time.
index is a special variable. Expressions sort the selected notes by time and position in ascending order (smaller time is processed first). Then, the index variable for the first processed note is 0, for the second is 1, and so on. This is a read-only variable.
Read-only and write-only variables
You cannot modify read-only variables or read write-only variables in expressions. Doing so will cause expression execution to fail.
About the bar/abar properties
These properties let you move notes directly by measure number without doing BPM conversion manually.
For example, under a 4/4 Timing Point, bar = bar + 3/16 moves the note later by 3 sixteenth notes, while bar = bar + 2 + 3/28 moves it later by two measures and 3 twenty-eighth notes.
This property also supports calculations across Timing Points, because when bar is written, it is not calculated based on an absolute value.
- It is calculated based on a relative value, namely the change in
bar.- After obtaining the bar delta, note movement skips bar values that do not exist at Timing Point gaps. This makes movement operations such as
+3/16convenient to use. - If you are not sure what an absolute value means here, it is the absolute measure number in DyNode. See Timing/Time and Bar Numbers. You can also see the absolute measure number by pressing Ctrl+B or by checking the number to the right of the white measure line.
- After obtaining the bar delta, note movement skips bar values that do not exist at Timing Point gaps. This makes movement operations such as
- Therefore, directly assigning values such as
bar = 20will probably not give the result you want.
If you need absolute-value writing, use the abar variable. abar is a write-only variable dedicated to modifying the absolute measure number.
The currently supported functions and built-in variables are listed in the table below:
| Function | Function |
|---|---|
pow(a, b) | Returns a raised to b. |
sin(x) | Returns the sine of x (radians). |
cos(x) | Returns the cosine of x (radians). |
step(edge, x) | Step function, returns 1 if x >= edge, else 0. |
clamp(x, min, max) | Constrains x between min and max. |
exp(x) | Returns e raised to x. |
floor(x) | Rounds x down to integer. |
ceil(x) | Rounds x up to integer. |
round(x) | Rounds x to the nearest integer. |
rand(x) | Returns a random real number in [0, x]. |
randr(l, r) | Returns a random real number in [l, r]. |
irand(x) | Returns a random integer in [0, x]. |
irandr(l, r) | Returns a random integer in [l, r]. |
btt(bar) | Converts an absolute measure number to absolute time in ms. |
ttb(time) | Converts absolute time in ms to an absolute measure number. |
tabd(time, deltaBar) | Returns the absolute time after moving time by deltaBar measures, skipping nonexistent bars. |
| Variable | Description |
|---|---|
pi | Read-only constant that returns the precise value of π. |
bar, abar, bpm, meter, tptime, btt, ttb, and tabd all require Timing Points to be set correctly. If no Timing Point exists, the expression will fail.
The expression is computed independently on each note. The computation process is as follows:
- The expression's variables are initialized based on the note's properties.
- The expression is evaluated, and variables may change during computation.
- During this process, the note's properties also change in real time as the expression variables change.
- The final modified note properties are applied to the actual notes in the chart.
In DyNode, multiple expressions are separated by ; and are executed sequentially. All variables are stored as double-precision floating-point numbers.
Note that some variables are restricted to certain note types; that is, they only affect specific types of notes. All computations will ignore SUB type notes (the tail notes of HOLD notes). See Modifying HOLD Properties for details.
Specifically, the falling side property (side) will always be taken modulo 3. For example, setting side to 1, 4, or -2 is equivalent.
Below are some valid examples of expressions, each on a separate line:
wid=wid*2                       // Double the width of the note
pos=2.5                         // Set the note position to 2.5
time=time+10                    // Increase the note time by 10ms (adding delay)

pos=2*2.5-pos                   // Mirror the note across the center at position 2.5
time=time/1.5;len=len/1.5       // Speed up the chart by a factor of 1.5 (divide all note times and HOLD durations by 1.5)
a=20;time=a                     // Define variable a and assign it to time

side=side+1                     // Move front notes to the left, left notes to the right, and right notes to the front
pos=(side==0)*2+(side!=0)*pos   // Only change the position of front notes to 2
side=-side                      // Swap left and right side notes
Modifying HOLD Properties
All expression evaluations ignore SUB type notes. Instead, for HOLD type notes there are special property variables available:
| Property | Function | Unit |
|---|---|---|
len | The duration of the note. | ms |
htime | The head time of the note. | ms |
etime | The tail time of the note. | ms |
This means that modifying the time property of a HOLD note will not affect its duration; changing time effectively moves the entire HOLD note rather than adjusting its head and tail separately.
If you want to modify the head and tail separately, you need to change the htime and etime properties instead of time.
Modifying these three properties may cause their values to change together. For example, if you modify htime or etime, then len (and time) will also change in real time.
Tips
When you modify multiple such properties in one expression, they do not conflict because expressions are executed one by one in order.
For example:
etime=etime-10; time=time+10
This means:
- First, modify the tail's absolute time by -10.
- Then, move the whole note by +10.
- This operation also increases both
etimeandhtimeby 10. However, because expressions are executed sequentially rather than in parallel, it does not conflict with the previous operation.
- This operation also increases both
- In the end,
htimeis increased by 10 relative to the original value, whileetimeis unchanged relative to the original value.
What if I want to use bar in HOLD-only properties?
For other time modification needs, you can use the btt / ttb / tabd functions to perform absolute or relative conversions between measure numbers and time.
bar and abar are also essentially wrappers around these functions.
Here are some valid examples of modifying HOLD properties:
htime=htime+10;etime=etime-10       // Increase the head time by 10ms and decrease the tail time by 10ms for all HOLD notes
len=len/2                           // Halve the duration of all HOLD notes
htime=100                           // Set the head time of all HOLD notes to 100ms
htime=100;len=100                   // Equivalent to time=100;len=100